To Change or Remove Drive Letter Manually in Registry Editor 1. Open the Start Menu, then type regedit in the search box and press enter.
2. If prompted by UAC, then click on Yes.
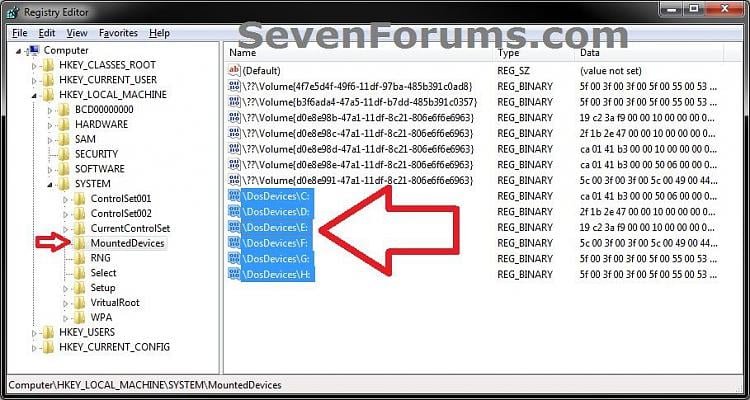
3. In regedit, navigate to the location below. (see screenshot below)
WARNING: Do not change the C: drive letter.
WARNING: Do not remove the C: drive letter.
7. Log off and log on, or restart the computer to apply the changes.
Source: HERE!
2. If prompted by UAC, then click on Yes.
3. In regedit, navigate to the location below. (see screenshot below)
HKEY_LOCAL_MACHINE\SYSTEM\MountedDevices4. To Change a Drive Letter
WARNING: Do not change the C: drive letter.
A) Right click on a listed /DosDevices\(drive letter) (Ex: /DosDevices\D: ) that you want to change the drive letter of, then click on Rename. (see screenshot above)5. To Remove a Drive Letter
B) Rename it with a drive letter that you want to use, and is not already listed here, and press enter. (see screenshot above)
For Example: If I wanted to change it from D: to K: , then I would rename it to /DosDevices\K: instead.
WARNING: Do not remove the C: drive letter.
A) Right click on a listed /DosDevices\(drive letter) (Ex: /DosDevices\D: ) that you want to remove the drive letter of, then click on Delete. (see screenshot above)6. Close regedit.
B) Click on Yes to confirm the deletion. (see screenshot below)
7. Log off and log on, or restart the computer to apply the changes.
Source: HERE!

